17 Jul That difficult shift from commercial henna cones to home-made henna cones!

Have you thought about making your own henna paste? Maybe procrastinated for the longest time about making it yourself because you just don’t know where to start and what to do? Or maybe, you’ve heard people say that the henna cones from eBay and Indian stores aren’t natural although they claim they are, and you’re not sure where to get the legit natural cones? Or maybe you have just been told off by someone who use homemade cones and they think they’re better than you because they use 100% natural cones, while your skill and designs are way better?
Well, don’t worry, because I’m here to help you.
I’ve always called myself a professional henna artist because i think my work is good enough that people are willing to pay me for what i do. I’ve used commercial henna cones for so many years until I learnt about ‘natural’ henna. Okay lets be real here, If you have been using a henna cone that has a label saying ‘natural henna’ there’s no reason to question it right? Plus it’s coming from India/Pakistan, seems more authentic and legit isn’t it? I’m definitely not here to tell you they are all bad stuff and don’t use it.
I love doing henna. It makes me feel relaxed, especially when i have the freedom to create and design new art. But obviously, as I was growing up I came to notice some drama about the use of Natural henna. I was simply young and curious. I thought, maybe, why don’t I try making this myself. It can’t be that hard?
Called my mum one day, and asked her, can you tell me how to make my own henna. She was surprised, but shared with me a really traditional recipe.
I attempted it a few times, but the henna was just not staining well. Not as good as the commercial ones from India/Pakistan at least. So my curious mind, only wanted to explore more and learn more about this tool that I’m using to create such beautiful work.
After months and months of trying, I have finally perfected it and I’m confident enough to share my recipe to everyone. There’s no secret I want to hide, I want to only share what I know, and we all grow together as a community.
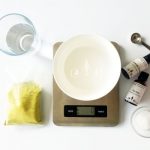
So, let’s break it down. What do we need?
30g Sugar (Free from your Kitchen)
Water (Free from the tap)
So, ideally you’re only paying for the henna powder and the essential oil. A total of 30 bucks that would give you about 30 cones on average, if your cones were about 10-15g each. That’s like $1 a henna cone! It can’t get better than that isn’t it?
- Cheap
- Natural
- Smells so good!!
Sounds like a good deal yeah?
What’s better? You know exactly how you made it and you are aware of what you put on your precious skin.
Commercial/ Factory-made henna cones contain unknown preservatives so that the henna stains turn dark in a couple of hours – This characteristic should be your first alarm that informs you that there’s something unnatural happening here. If you just plucked out the leaves from a henna plant, crushed it in the kitchen and mixed it with water or lemon juice, it will give you a nice, deep pumpkin coloured stain. This stain will take about 24 – 48 hours to oxide and become reddish brown – That’s the completely crushed leaves/ natural concept I’m talking about.
So, when commercial henna cones stain so quickly, there is clearly something added to it – Chemical X, unknown ingredient. I’m not going to say, it’s bad or nasty and you shouldn’t use it. However, when you have a better, natural alternative, why not choose the safer option, right?
How do I know if there are chemicals in them? Well, to be honest. I have no evidence. I am no scientist. But in science class we all learnt that when a chemical reaction takes place, you need to get a certain result. Now, if the result is different, something is wrong somewhere? Yes? Oh and, just smell the factory made cones – you can smell the chemicals in them more than the smell of natural henna.
When you make a natural henna paste, it’s almost like food. You need to use it within 3-4 days because after 5 days, the oil in the henna starts separating, the properties change and the henna doesn’t stain your skin very well. If you’re not using it, best is to freeze it. You can freeze fresh henna cones for about 6 months – Knowing that; it is reasonable to question, how is it the commercial cones stain perfectly fine within a couple of hours and we can keep it in room temperature for months and months, and everything is still alright? Something to think about maybe?
It’s of course, completely up to you if you feel like caring for your body and apply something natural to your skin vs. the chemical based items. Your Body, Your call!
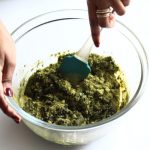
So here’s how we make a home-made henna paste which is completely natural! Honestly, this is like baking, except, no cooking involved.
Add the dry ingredients.
- Henna powder
- Sugar
Mix it
Add the wet ingredients.
Mix it till you break all the lumps and get a beautiful consistency like Honey!
Cling wrap over the bowl. Keep it aside, and you can use it in 12 hours!
Okay, sometimes it’s easier said than done.
I’ll post a video tutorial on ‘How to make your own henna paste’ Next!
Thank you for reading!
Happy for you to leave your comments 🙂
AP.

suba
Posted at 05:25h, 01 Augusthi could you show us how to make our own home made henna. you have given the ingredients, but we would like to the amount of each ingredient you add. for example the henna powder is 100g, so how much essential oil do we add and if i am mixng two or more essential oil wat is the measurement to add? it would be a great help if you could have a video of it. thanks.
hennabyalisaparveen
Posted at 10:42h, 07 AugustSure Suba, will write about it soon. Thank you for the feedback! 🙂